PDP


Partner Perspectives
December 22, 2025
How to milk like a veterinarian for mastitis control
By Dr. Angela Kinney
Proper milking procedures are the cornerstone of maintaining udder health and preventing mastitis in dairy herds. Let's walk through the critical steps every dairy operation should follow to optimize milk quality and cow comfort.
Pre-Milking: the foundation of success
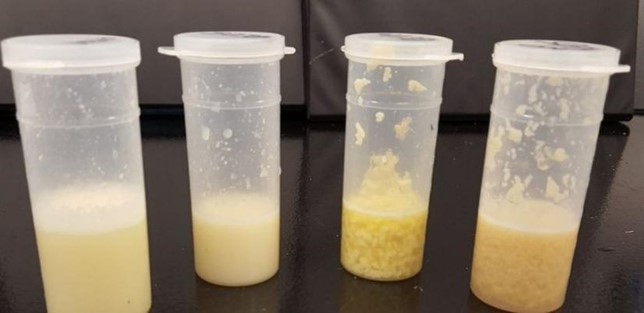
Start by examining foremilk: it's your first line of defense. Strip the first few streams and look for flakes, clots, stringiness, or a watery appearance. These abnormalities, along with off-color or bloody milk, are indicators of infection. This simple practice facilitates early detection of clinical mastitis and triggers proper milk letdown through physical stimulation and oxytocin release.
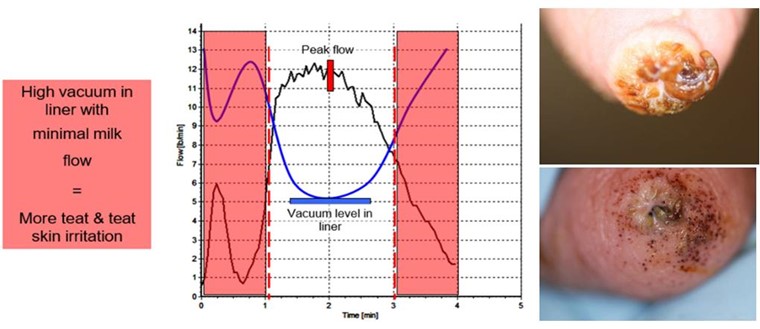
Here's the key: there's a crucial prep-lag time of around 60 seconds between initial stimulation and maximum milk letdown, followed by a 90 to 120 second window for optimal milk flow. Miss this window, and you risk bimodal milk flow, which can damage teat ends and increase mastitis risk.
Ensure teats are clean and dry before milking, paying special attention to teat ends which are very important for stimulation and milk let down. If local regulations allow, apply pre-milking teat disinfectant that completely covers the teat skin (ideally at least the lower two-thirds) and allow it to remain on teats for at least 30 seconds. Then dry teats using a properly washed and disinfected cloth towel for use on one cow, or a single service paper towel.
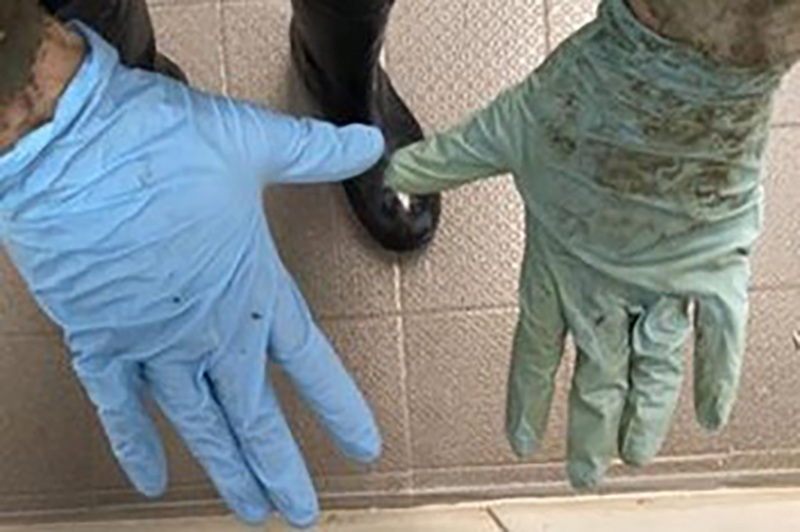
Wearing clean gloves during the milking process makes a big difference. Studies have shown 75% fewer bacteria on used gloves than on bare hands, and wearing gloves reduces the spread of contagious and environmental bacteria by 50%. Gloves help exclude bacteria and dirt from the cracks, crevices, and fingernail beds on your hands, and their smooth surface can easily be disinfected between cows.
During milking: precision matters
Attach teat cups squarely and level with the udder within that critical 90 to 120 second window. Proper alignment ensures smooth, even milk flow and reduces the risk of teat damage and mastitis. Adjust the cluster to hang squarely beneath the udder, with the long milk tube and pulse rubber in line with the cow's backbone, especially in herringbone parlors.
If liner slips or squawks occur, adjust the unit immediately. Liner slips allow air to enter the system, causing vacuum fluctuations that can impact bacteria-laden milk droplets against the teat end. If you experience frequent liner slips or squawks (more than 5-10 slips per 100 milkings), it indicates a problem that requires further investigation.
Post-milking: seal the deal
With manual removal, shut off vacuum to the claw before removing the cluster to prevent air blasts. Machine striping can cause trauma to the teat end and increase mastitis risk, so avoid it. Apply teat disinfectant immediately following teat cup removal and assure complete coverage of teats. A complete and correctly dipped teat will leave a full, singular blot on the paper towel. To optimize mastitis control and reduce costs, teat dipping is preferred to spraying as the method of disinfectant application.
Finally, milk cows with confirmed contagious intramammary infections last. Contagious pathogens like Staphylococcus aureus are primarily spread from cow to cow during milking through contaminated equipment. By milking infected animals last, you can help contain the spread and improve overall udder health.
Dr. Angela Kinney, BouMatic’s certified veterinarian, is a professional in milk quality and animal care with 20 years of experience. BouMatic is a Corporate Partner of Professional Dairy Producers®. Dr. Kinney can be reached at akinney@boumatic.com
PDP is Dairy's Professional Development Organization. Producer-led and membership-based, we're here to share ideas, solutions, resources and experiences that help individual dairy producers – and our industry as a whole – succeed. Our focus is on producer professionalism, stakeholder engagement and unified outreach.
Site Hosted & Maintained by USAgNet